User Guide
Health Connect
Health Connect is an application designed to streamline client management for Singapore based healthcare professionals. It allows users to efficiently track client details and appointments, simplifying the management process.
Table of Contents
- Quick Start
- Features
- Command Format
- Parameter Constraints
- Viewing Help:
help - Adding a Person:
add - Viewing All Patients
view - Editing a Patient:
edit - Locating Patients by Name:
find - Locating Patients by Features:
filter - Deleting a Patient:
delete - Adding Or Updating Appointment Date and Time to Patient:
date - Seeing the Schedule for the Day:
schedule - Clearing All Entries:
clear - Exiting the Program:
exit
- Data
- FAQ
- Known Issues
- Command Summary
Quick Start
For Windows Users:
- Ensure you have Java
17installed in your Computer.- Open Command Prompt. You can do this by clicking the Windows Start or Search button and type
cmd.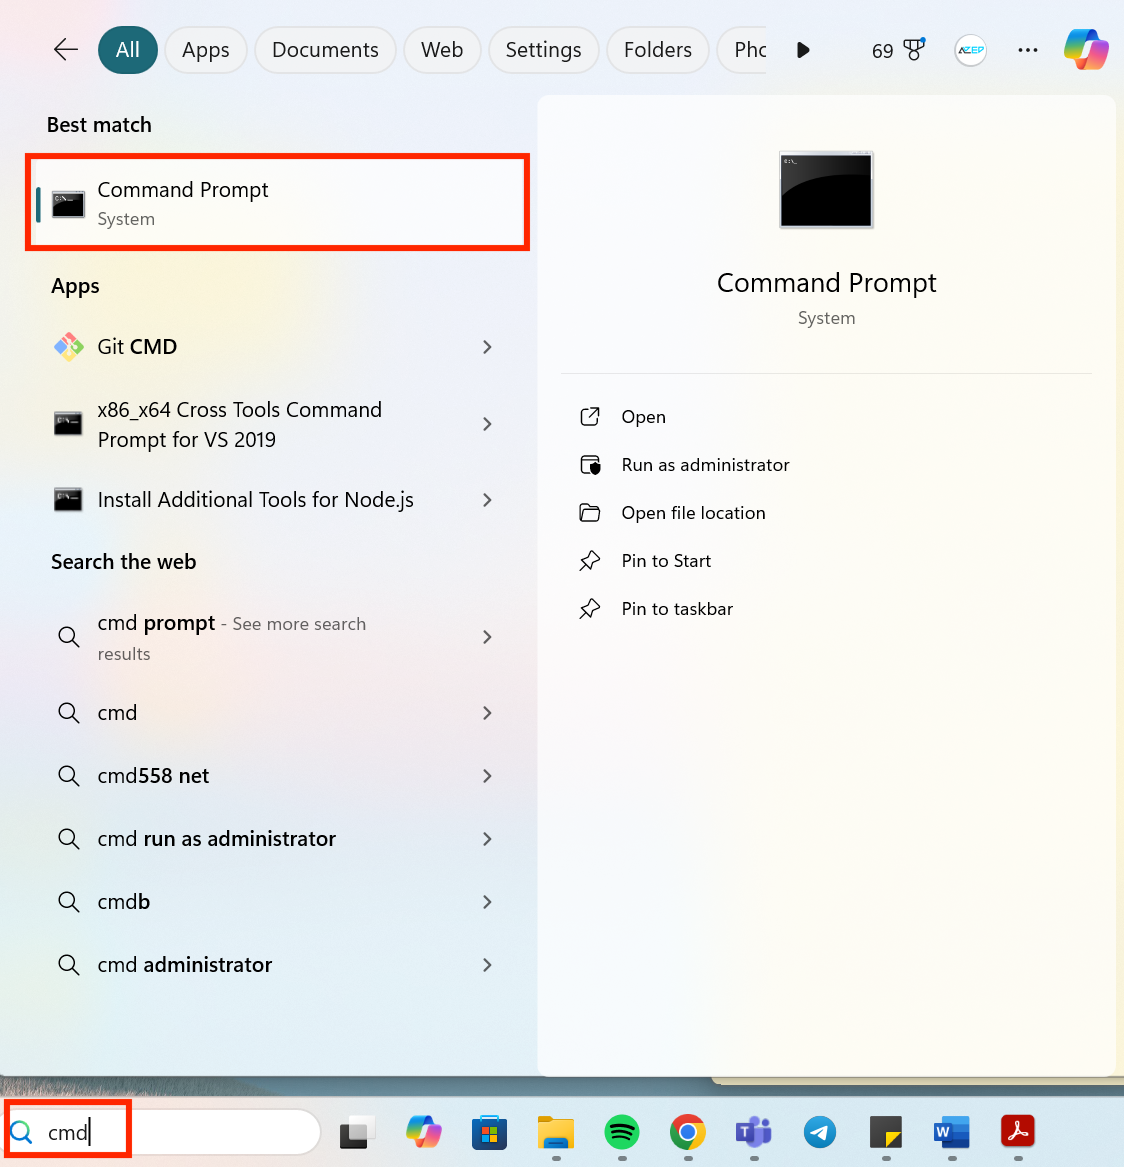
- Once Command Prompt is open, type:
java -versionand clickEnter.
- If Java
17is displayed, you are good to go! Proceed to Step 3.
- Otherwise, proceed to Step 2.
- Open Command Prompt. You can do this by clicking the Windows Start or Search button and type
- If you do not have Java
17from the previous step, install the correct version of Java.- Proceed to the official website to download Java
17. - Download the appropriate installer for Windows.
- After installation, follow the instructions in Step 1.
- Proceed to the official website to download Java
- Download the latest jar file here.
- Copy the file to the folder you want to use as the home folder for Health Connect. The home folder should only contain the jar file.
- Use Command Prompt to open the JAR file.
- Find the file path of the file you just copied. To do so, right-click on the file in the folder and press
Properties.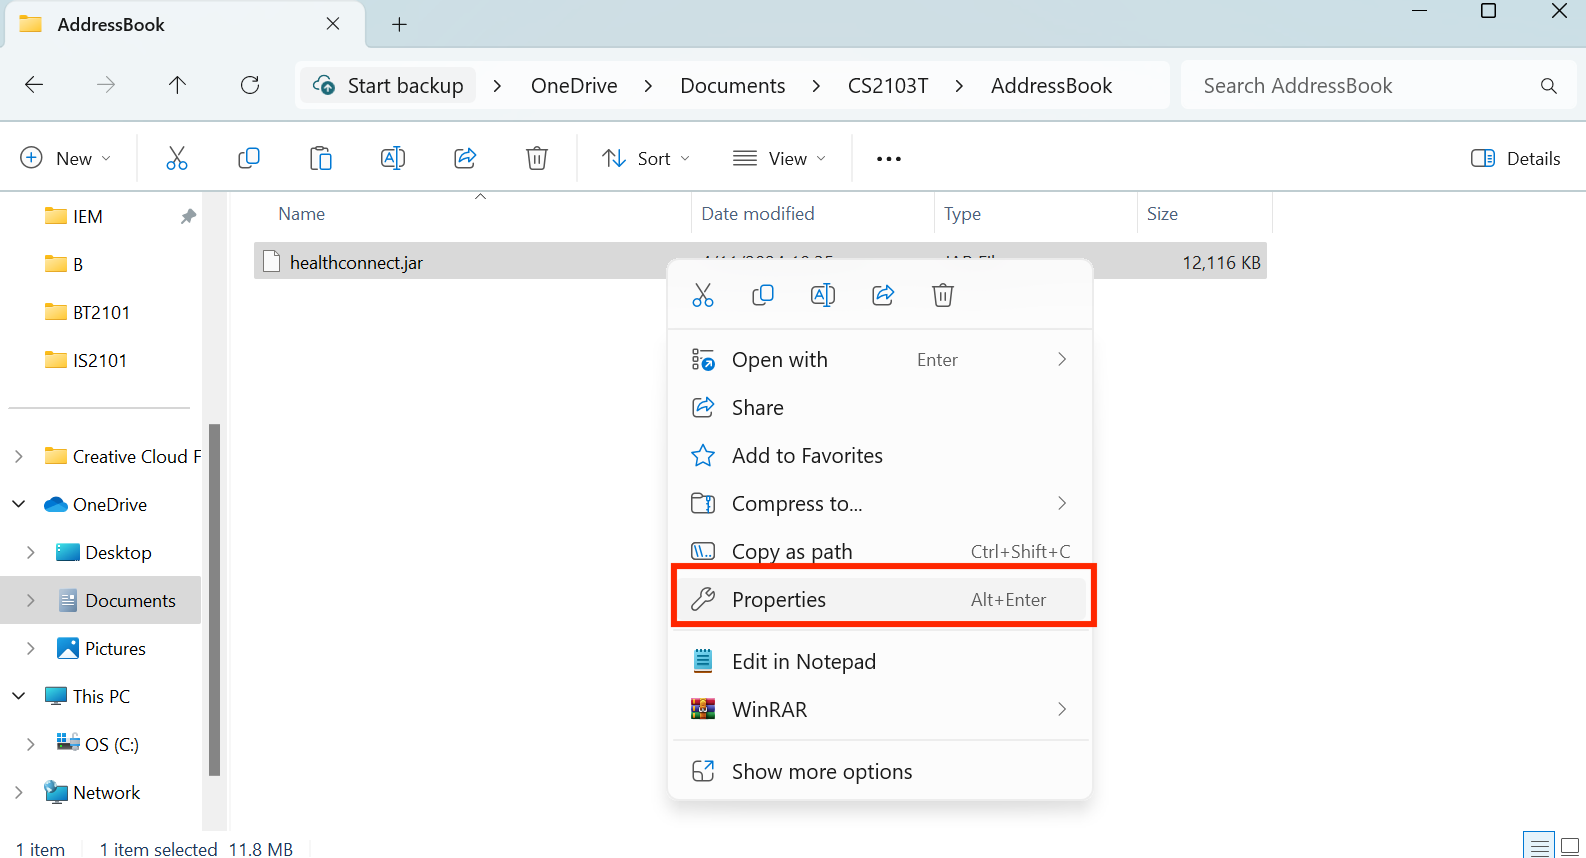
- Check the File Path by noticing the path after your username under Location.
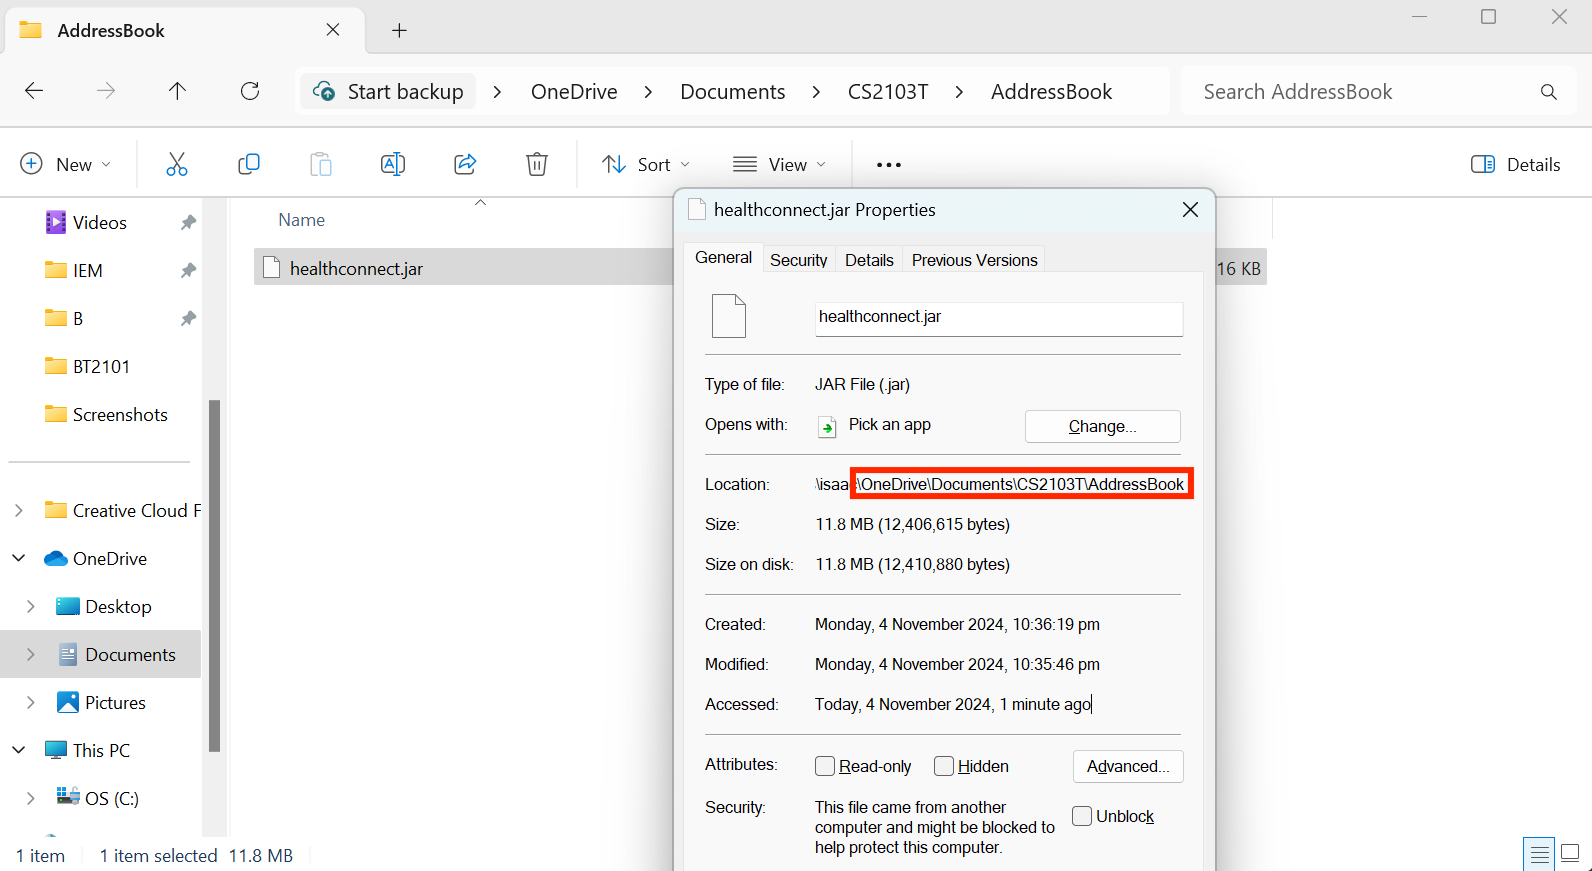 For example, in this case, the required
 FILEPATHwill beOneDrive/Documents/CS2103T/AddressBook - In Command Prompt, enter
cd FILEPATH, replacingFILEPATHwith your own path obtained. Following the previous example, you should entercd OneDrive/Documents/CS2103T/AddressBookas follows: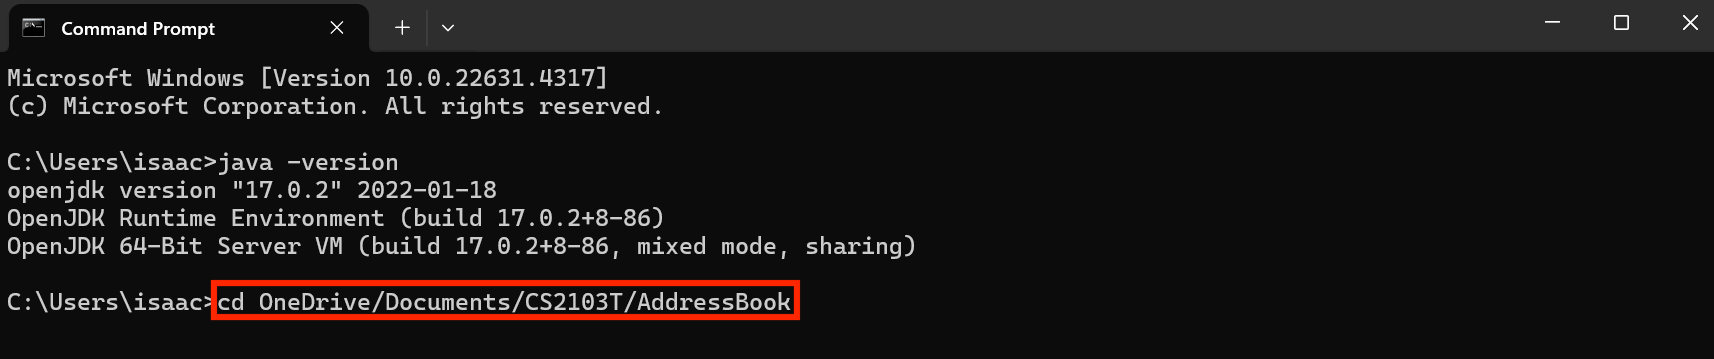
- In Command Prompt, enter
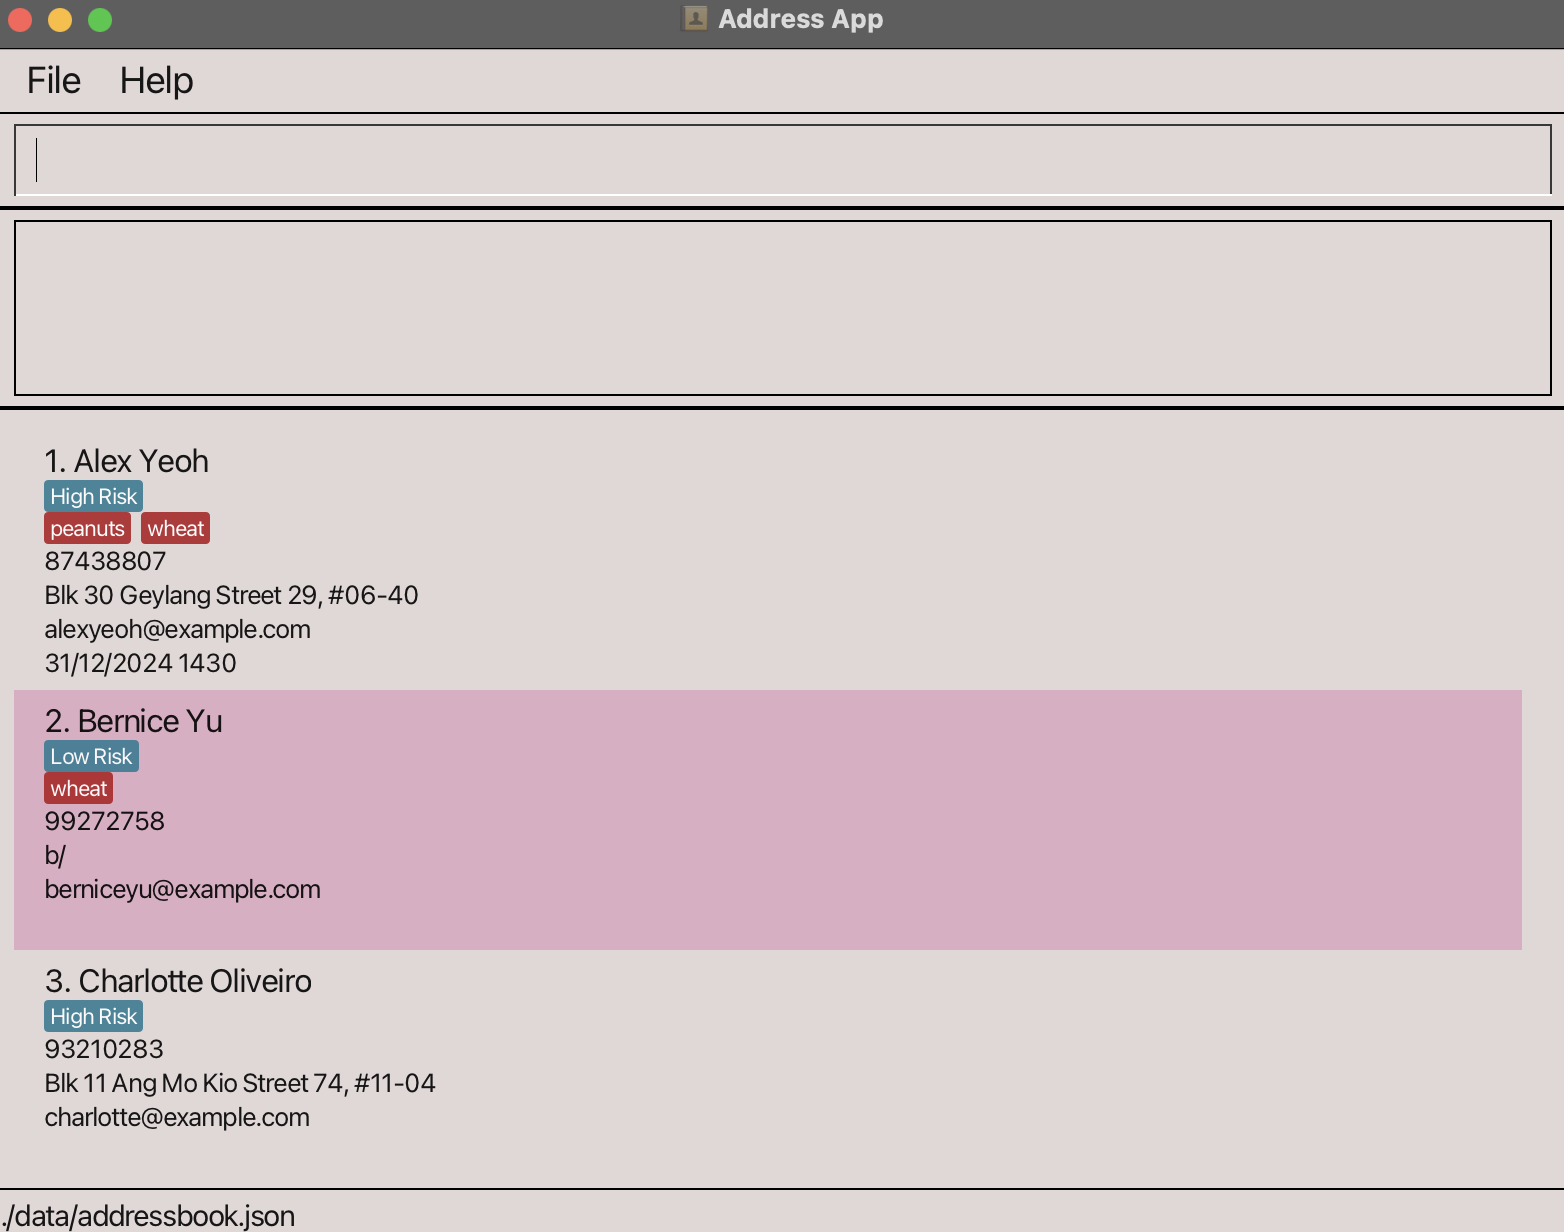
java -jar healthconnect.jar.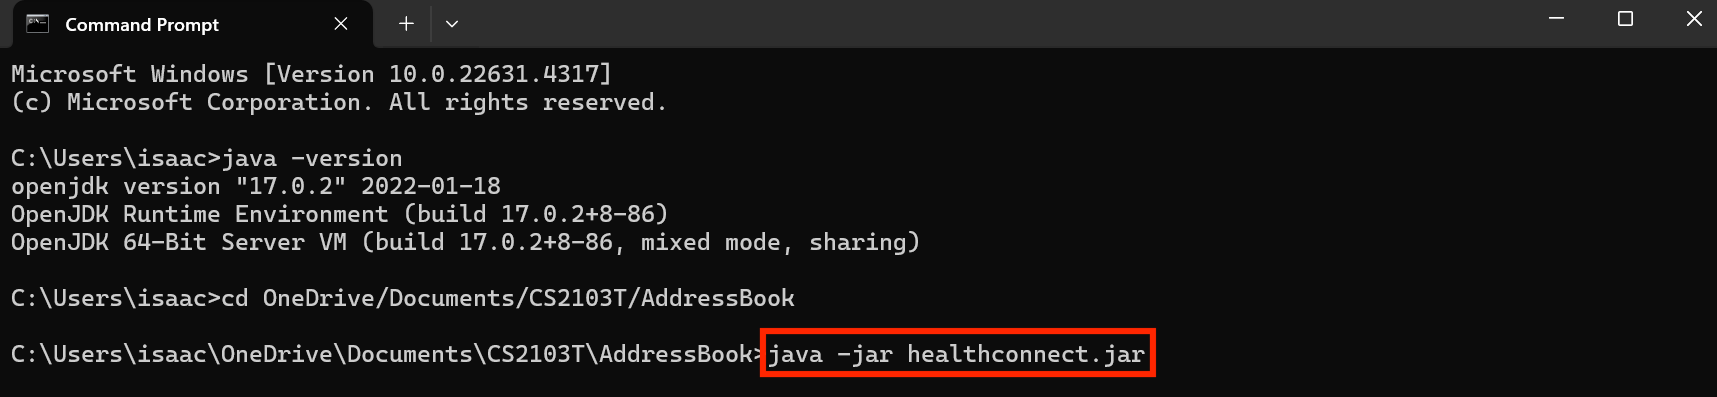
- A GUI similar to the screenshot below should appear in a few seconds.
- Find the file path of the file you just copied. To do so, right-click on the file in the folder and press
- Type the command in the command box and press Enter to execute it. e.g. typing
helpand pressing Enter will open the help window.
Some example commands you can try:view: Displays all contacts.add n/John Doe p/98765432 e/johnd@example.com a/John street, block 123, #01-01 t/High Risk m/Wheat: Adds a contact namedJohn Doeto the Address Book.delete n/John Doe: Deletes contact namedJohn Doefrom the current list.filter t/High Risk: Displays all entries which are taggedHigh Risk.clear: Deletes all contacts.exit: Exits the app.
- Refer to the Features below for details of each command.
For Mac Users:
- Ensure you have the
Azulversion of Java17installed in your Computer.- Open Terminal. You can do this by searching for it using Spotlight Search. To do so, press
Command + Spaceand search “Terminal”.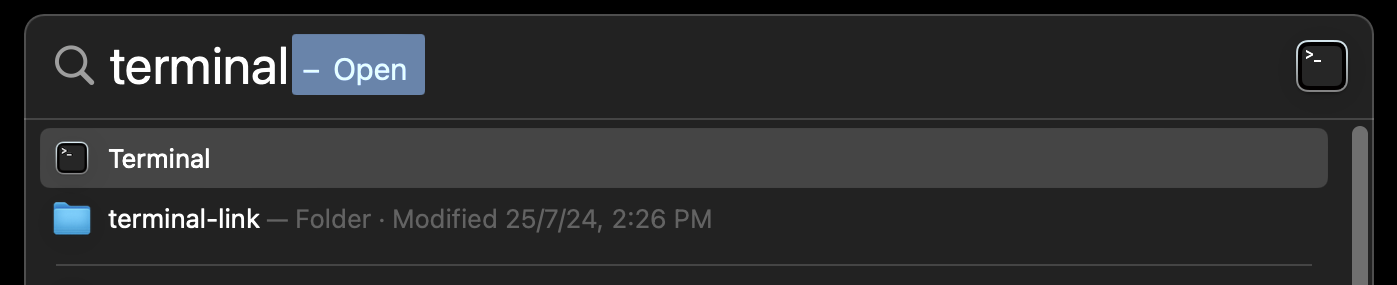
- Once Terminal is open, type:
java -versionand clickEnter.
- If Java
17andZulu17are displayed, you are good to go! Proceed to step 3.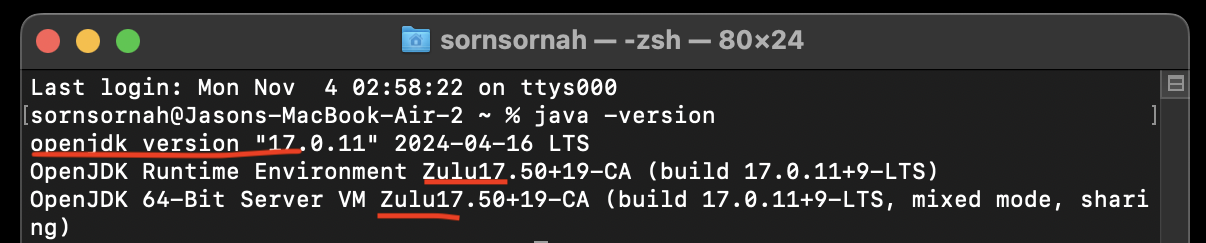
- Otherwise, proceed to step 2.
- Open Terminal. You can do this by searching for it using Spotlight Search. To do so, press
- If you do not have the
Azulversion of Java17from the previous step, install the correct version of Java by following the instructions on this page.- After installation, follow the instructions in Step 1.
- After installation, follow the instructions in Step 1.
- Download the latest jar file here.
- Copy the file to the folder you want to use as the home folder for Health Connect. The home folder should only contain the jar file.
- Use Terminal to open the JAR file.
- Find the file path of the file you just copied. To do so, right-click on the file in Finder and press
Get Info.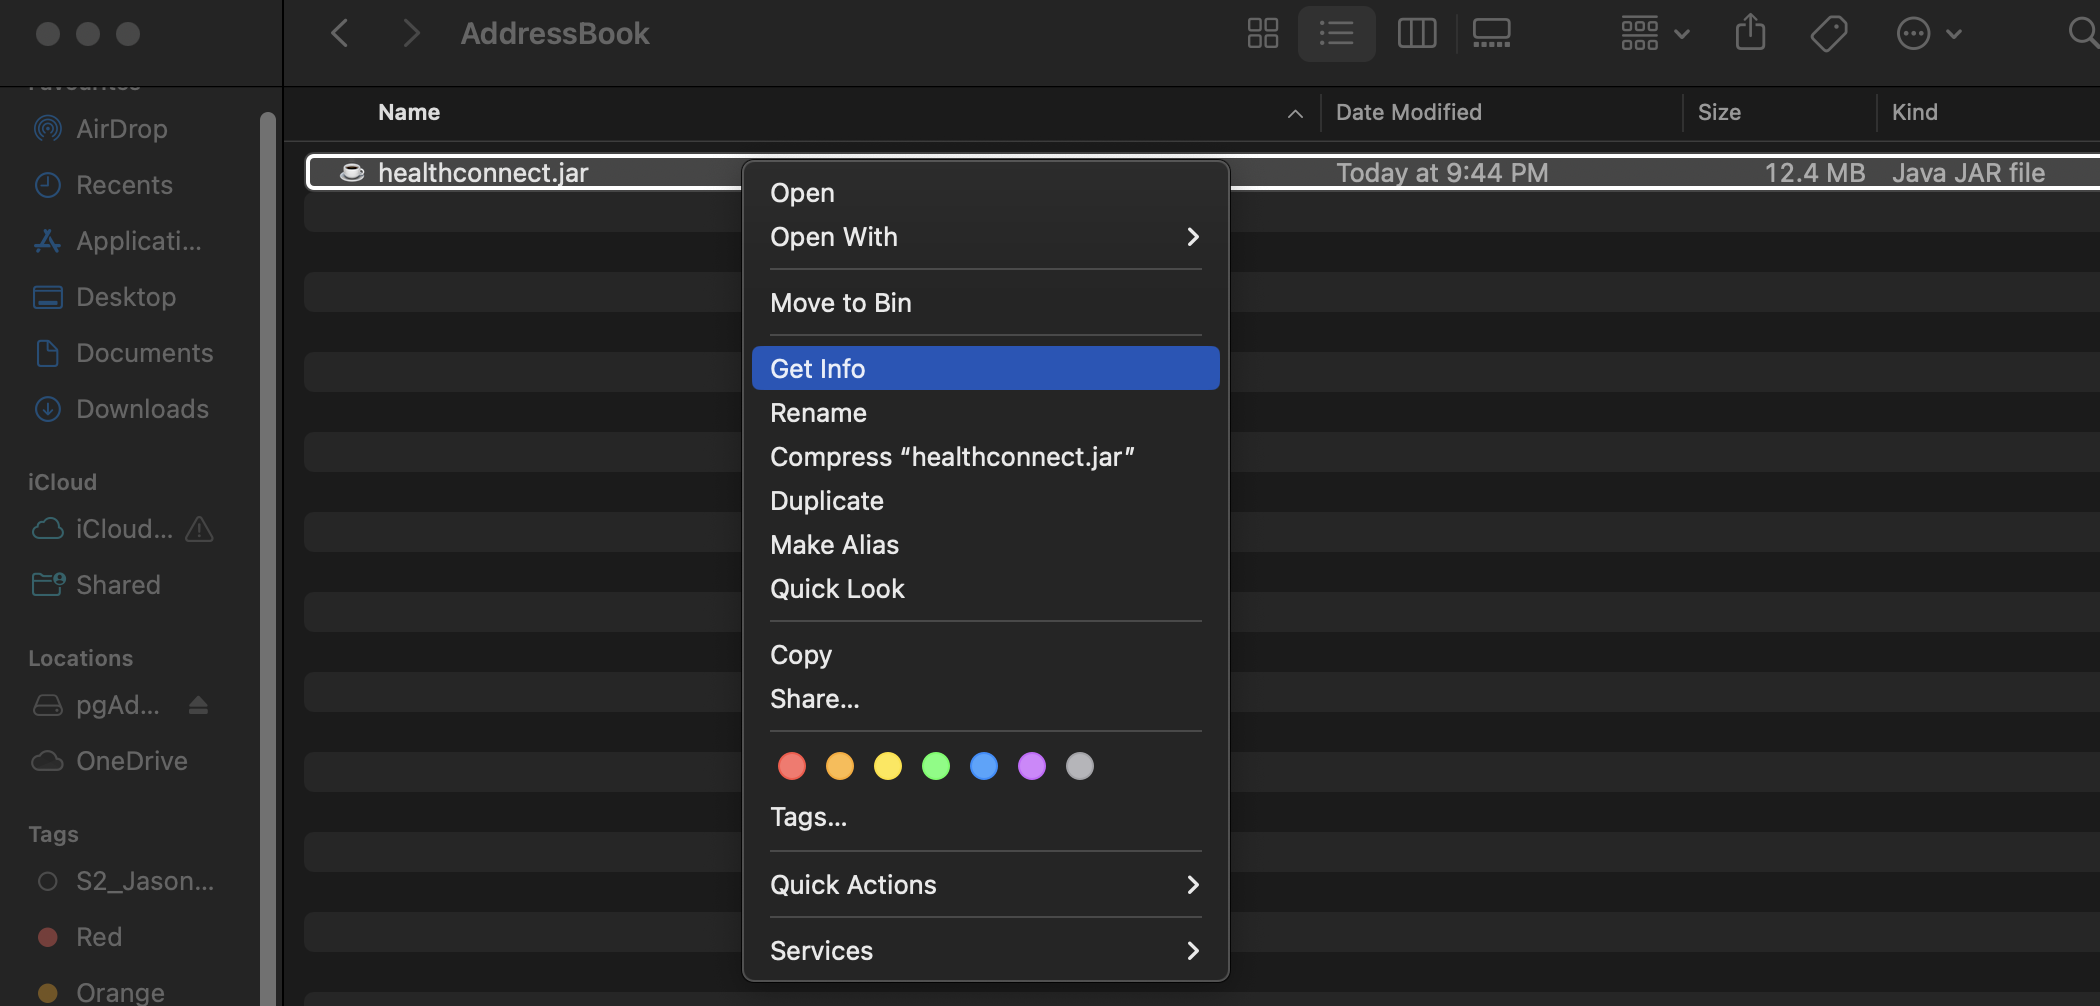
- Check the File Path by noting the path after your username under Where.
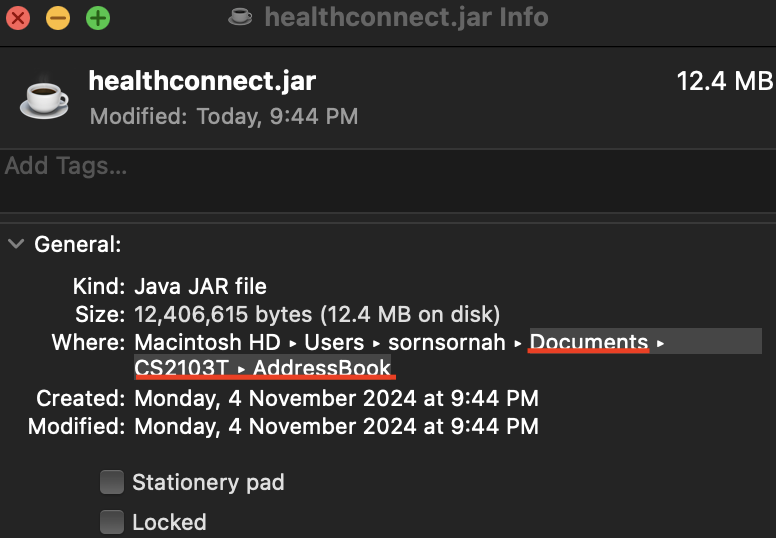 For example, in this case, the required
 FILEPATHwill beDocuments/CS2103T/AddressBook - In Terminal, enter
cd FILEPATH, replacingFILEPATHwith your own path obtained. Following the previous example, you should entercd Documents/CS2103T/AddressBookas follows: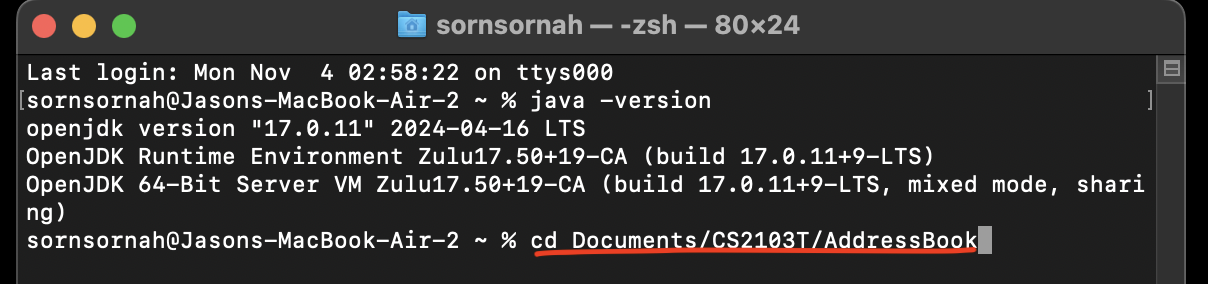
- In Terminal, enter
java -jar healthconnect.jar.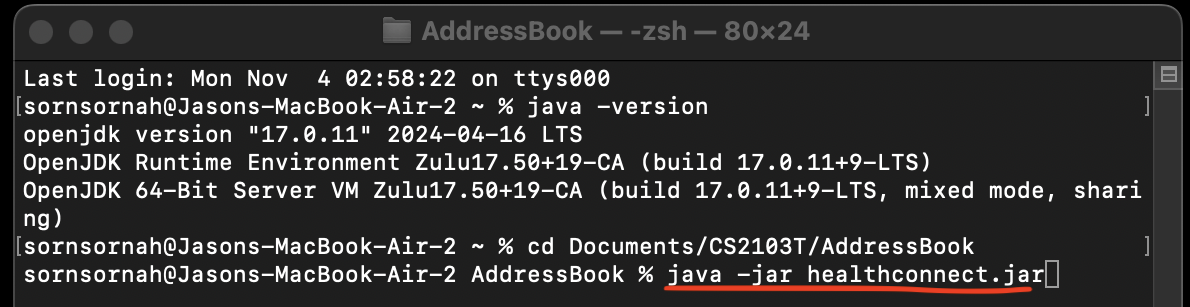
- A GUI similar to the below should appear in a few seconds.
- Find the file path of the file you just copied. To do so, right-click on the file in Finder and press
- Type the command in the command box and press Enter to execute it. e.g. typing
helpand pressing Enter will open the help window.
Some example commands you can try:view: Displays all contacts.add n/John Doe p/98765432 e/johnd@example.com a/John street, block 123, #01-01 t/High Risk m/Wheat: Adds a contact namedJohn Doeto the Address Book.delete n/John Doe: Deletes contact namedJohn Doefrom the current list.filter t/High Risk: Displays all entries which are taggedHigh Risk.clear: Deletes all contacts.exit: Exits the app.
- Refer to the Features below for details of each command.
Features
Command Format
-
Words in
UPPER_CASEare the parameters to be supplied by the user.
e.g. inadd n/NAME,NAMEis a parameter which can be used asadd n/John Doe. -
Items in square brackets are optional.
e.gn/NAME [p/PHONE]can be used asn/John Doe p/98765432or asn/John Doe. -
Parameters can be in any order.
e.g. if the command specifiesn/NAME p/PHONE,p/PHONE n/NAMEis also acceptable. -
Extraneous parameters for commands that do not take in parameters (such as
help,view,exitandclear) will be ignored.
e.g. If the command specifieshelp 123, it will be interpreted ashelp. -
Prefixes are case-sensitive, and must be in lower case.
e.g.n/is allowed butN/is not allowed -
If you are using a PDF version of this document, be careful when copying and pasting commands that span multiple lines as space characters surrounding line-breaks may be omitted when copied over to the application.
-
The following are considered duplicate patients:
- Same name AND same phone number
- Same name AND same email
- Same name, same phone number AND same email
- Note: same phone number AND same email AND different name are not considered as a duplicate patient since the patient might use their Next Of Kin’s contact details
Parameter Constraints
- NAME
- The string must be alphanumeric and contain at least one alphabetic character (i.e., it cannot consist entirely of numbers). Special characters allowed are space (‘ ‘), slash (‘/’), and hyphen (‘-‘).
- However, since
d/is a recognized parameter, names containingd/oare not accepted in this version of Health Connect (thoughs/ois allowed). - If a patient’s name includes
d/o, format it instead as suchd o, for example,Siti d o Raja.
- PHONE
- Must be exactly 8 digits long and start with 3, 6, 8 or 9 (adhering to Singapore phone numbers).
- Only numeric characters are allowed.
- EMAIL
- Must follow a valid email format and include a domain
[name]@[domain].[TLD]e.g.name@example.com - Can contain alphanumeric characters and special characters such as underscore
_, period.and hyphens-before the@symbol
- Must follow a valid email format and include a domain
- ADDRESS
- Address cannot be blank
- Since an address can consist of any combination of characters (including
/), there are no restrictions on the input format for this field. - Be aware that adding unrecognized parameters (e.g., g/) after the address tag
a/will not trigger an error.- For example,
add n/John Doe p/98765432 e/johnd@example.com a/123 Elm Street g/UNRECOGNISED_PARAMETER t/low risk m/Nonewill still be accepted as valid input without any errors.
- For example,
- TAG
- A patient must have one of the following priority tags:
High RiskMedium RiskLow Risk
- Note: tags are case-insensitive.
- A patient must have one of the following priority tags:
- ALLERGY
- Only include alphanumeric characters, spaces, and commas.
- Must not be empty or contain special characters other than commas and spaces.
- If a patient has multiple allergies, they can be listed in the add command like this:
m/Allergy1 m/Allergy2 - If a patient has no allergies, use this format:
m/None - A patient cannot have any other allergy if he or she has
m/Noneas an allergy. (i.e.m/None m/Allergy2is not valid)
- INDEX
- Must be a positive integer: 1, 2, 3, …
- Must be an index number shown in the displayed patient list
- DATE_TIME
- Follows the format of
d/M/yyyy HHmm(More formats will be included in future iterations) 02/02/2024 1400and2/2/2024 1400are both valid and accepted date and time formats.- Can only contain numbers, ‘/’, and spaces.
- No spaces are allowed within the date and time format. For example,
2/ 0 2/ 20 24 14 00will result in an invalid date and time format error.
- Follows the format of
- DATE
- Follows the format of
d/M/yyyy(More formats will be included in future iterations) 02/02/2024and2/2/2024are both valid and accepted date formats.- Can only contain numbers and ‘/’
- No spaces are allowed within the date format. For example,
2/ 0 2/ 20 24will result in an invalid date format error.
- Follows the format of
Viewing help: help
Shows a message explaining how to access the help page.
Format: help

Adding a patient: add
Adds a patient to the address book.
Format: add n/NAME p/PHONE e/EMAIL a/ADDRESS t/TAG m/ALLERGY...
Parameter Constraints: NAME, PHONE, EMAIL, ADDRESS, TAG, ALLERGY
Additional Details:
- If multiple tags
t/... t/...are provided as an input, only the last tag will be taken.- For example:
add n/John Doe...t/Low Risk t/High Risk. The patientJohn Doewill be assigned the tagHigh Risk.
- For example:
Examples:
-
add n/John Doe p/98765432 e/johnd@example.com a/John street, block 123, #01-01 t/High Risk m/Lactose m/Gluten -
add n/Jane Doe p/98765432 e/janed@example.com a/Jane street, block 123, #01-01 t/High Risk m/Insulin m/Penicillin -
add n/Betsy-Crowe p/81239873 e/betsycrowe@example.com a/01 Clementi Road #04-03 Singapore 4374538 t/Low Risk m/None
Viewing all patients: view
Shows a list of all patients in the address book.
Format: view
Editing a patient : edit
Edits an existing patient in the address book.
Format: edit INDEX [n/NAME] [p/PHONE] [e/EMAIL] [a/ADDRESS] [t/TAG] [m/ALLERGY]...
Parameter Constraints: INDEX, NAME, PHONE, EMAIL, ADDRESS, TAG, ALLERGY
Additional Details:
- Edits the person at the specified
INDEX. The index refers to the index number shown in the displayed person list. - At least one of the optional fields must be provided.
- Existing values will be updated to the input values.
- When editing tags, the inputted tag will completely replace the current tag.
- You cannot remove a person’s tag using the edit feature, as the tag is a required field.
- If multiple tags
t/... t/...are provided as an input, only the last tag will be taken.- For example:
edit 2...t/Low Risk t/High Risk. The patient at index2will be assigned the tagHigh Risk.
- For example:
- When editing allergies, the inputted allergies will completely replace the current allergies.
Examples:
edit 1 p/91234567 e/johndoe@example.comEdits the phone number and email address of the person at index1to be91234567andjohndoe@example.comrespectively.edit 2 n/Betsy CrowerEdits the name of the person at index2to beBetsy Crower.
Locating patients by name: find
Finds patients whose names contain any of the given keywords.
Format: find KEYWORD [MORE_KEYWORDS]
Parameter Constraints: NAME
Additional Details:
- At least 1 keyword must be provided.
- The search is case-insensitive. e.g.
hanswill matchHans. - The order of the keywords does not matter. e.g.
Hans Bowill matchBo Hans. - Only the name is searched.
- Only full words will be matched. e.g.
Hanwill not matchHans.- Slashes
/and hyphens-will be considered as part of the full word. e.g.Betsywill not matchBetsy-Crowe
- Slashes
- Persons matching at least one keyword will be returned (i.e.
ORsearch). e.g.Hans Bowill returnHans Gruber,Bo Yang
Examples:
find JohnReturnsJohnandJohn Doefind bernice charlotteReturnsBerniceandCharlotte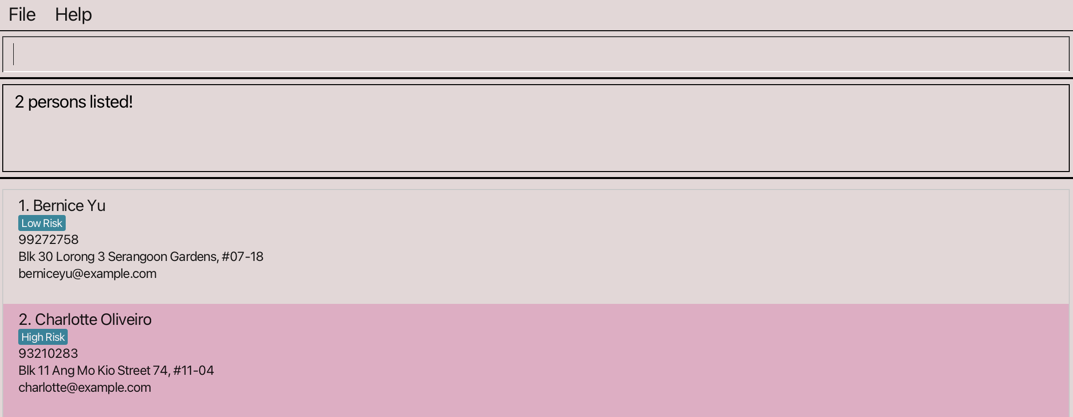
Locating patients by different parameters: filter
Filters the list to return patients who have the given features.
Format: filter PREFIX/FEATURE_NAME [PREFIX/FEATURE_NAME]
Parameter Constraints:PHONE, EMAIL, ADDRESS, TAG, ALLERGY
Additional Details:
- The search is case-sensitive.
- At least 1
PREFIX/FEATURE_NAMEmust be provided. - The order of the features does not matter. e.g.
t/ High Risk p/99999999will matchp/99999999 t/ High Risk - You can filter by tag, email, address, phone number and allergies.
- Only full words will be matched e.g.
99999999will not match999 - Allergies is the only attribute that allows multiple parameters. For other attributes, there can only be one of each feature as a maximum (i.e. cannot filter by two tags -
filter t/ High Risk t/Low Riskis considered invalid format and not accepted.) - The filter search uses AND logic between different attributes (e.g., tag and allergies) — all specified attributes must match. If multiple allergies are specified, it uses OR logic — an entry will match allergies attribute if it has any one of the specified allergies, or all.
For example:
filter t/High Risk m/Peanuts m/Dairywill return entries with theHigh Risktag and any of the allergies “Peanuts” or “Dairy”.filter m/Peanuts m/Dairywill return entries with eitherPeanutsorDairyallergy, or both. - Specifying any parameters beyond those required will result in an error.
- Filter requires at least one feature to filter by (e.g.
filteris an invalid format butfilter t/High Riskandfilter p/99999999are both accepted.) e.g.t/ High Risk p/99999999will return all patients with tagHigh Riskand phone number99999999
Examples:
filter t/High Risk a/John street, block 123, #01-01returns all patients who areHigh RiskAND have addressJohn street, block 123, #01-01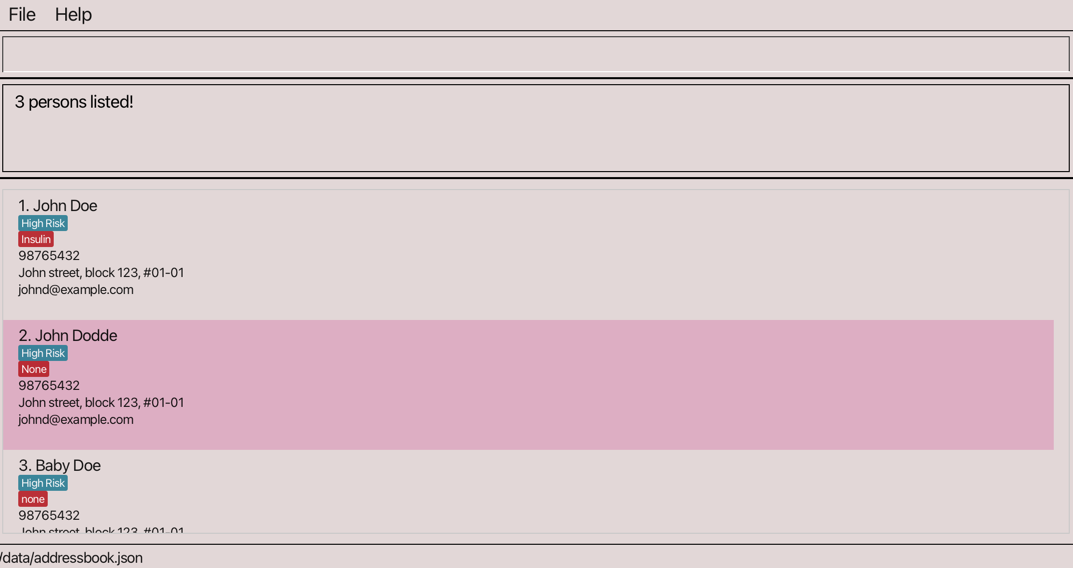
filter m/Penicillin p/88451234returns all patients who have an allergy topenicillinAND have the phone number88451234
Deleting a patient : delete
Deletes the specified patient from the address book.
Format: delete [n/NAME] [p/PHONE] [e/EMAIL]
Parameter Constraints: NAME, PHONE, EMAIL
Additional Details:
- Deletes the person that matches the following
NAME,PHONEand/orEMAIL - If the attributes provided (e.g.
NAME) cannot uniquely identify the patient, then more details (e.g.PHONEorEMAIL) need to be provided to uniquely match to a person.
Examples:
delete n/johnDeletesJohnassuming that there is only 1Johnin the address book.delete n/craig p/98761230DeletesCraigwith phone98761230assuming that there is only 1 patient with nameCraigand phone98761230in the address book
Adding or updating an appointment date and time to a person : date
Adds or updates the appointment date and time of the specified person in the address book. This for easy reference, so past appointments can be entered.
Format: date [n/NAME] [p/PHONE] [e/EMAIL] d/DATE_TIME
Parameter Constraints: NAME, PHONE, EMAIL, DATE_TIME
Additional Details:
- Adds or updates the next appointment date and time of person that uniquely matches at least one of the following three attributes
NAME,PHONEandEMAIL. - If the attributes provided (e.g.
NAME) cannot uniquely identify the patient, then more details (e.g.PHONEorEMAIL) need to be provided to uniquely match a person. - To remove the date and time from a person, use
d/Nonein the command. - 2 patients cannot have the same date and time for their appointment.
- When no date and time is set, no date and time are displayed.
- In the command format, the brackets around
n/NAME,p/PHONE, ande/EMAILindicate that these fields are flexible in their order and selection. This does not mean that all three fields can be left out, at least one must be provided. - This feature supports the year
0001onwards. Any years before that is not supported. - If the day, month, hour, or minute values are not in the range of valid possible values (e.g. month is between 1 and 12 or day is between 1 and 31), an error will be shown to the user for them to ensure their inputs are in range.
- The day must match the number of days in a month. This takes into account months when there are only 30 days and February when there are 28 or 29 days, depending on if it is a leap year. For example, if
31/4/2024 1200is input when APRIL only has 30 days, there will be an error since that date value is invalid. - The time is in the 24-hour format. (e.g.
1800for 6:00 PM) - The format of the date and time, as well as the values, must be valid or there will be an error. To avoid unnecessary inconvenience, leading zeroes for days and months are allowed.
(e.g.
01/01/2024 1400is parsed the same as1/1/2024 1400) - For uniformity and ease of validation, spaces between slashes in the date or in the time (e.g.,
1 / 1 / 2024 15 00) are not allowed. Use1/1/2024 1500instead. - The app allows users to enter past dates and times to provide flexibility in managing and storing patient information, preventing unnecessary limitations.
Examples:
date n/Jason Tan p/93823871 e/jasontan@gmail.com d/23/10/2024 1830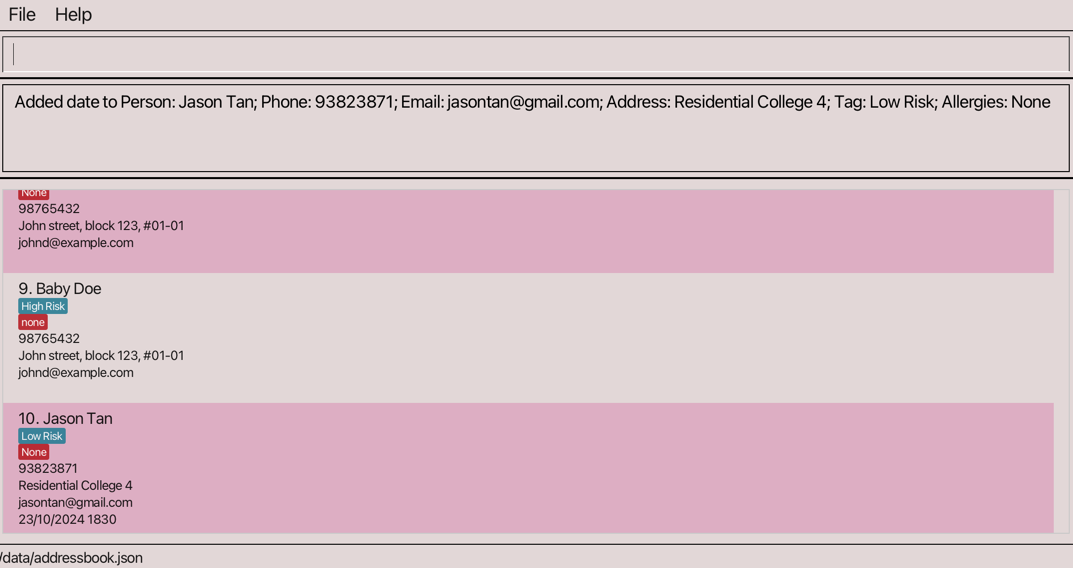 Adds appointment date and time
 23/10/2024 1830to patient with name:Jason Tan, phone:93823871, email:jasontan@gmail.comdate p/92938132 d/22/10/2024 1920Adds appointment date and time22/10/2024 1920to patient with phone:92938132date e/johndoe@gmail.com d/10/02/2023 1520Adds appointment date and time10/02/2023 1520to patient with emailjohndoe@gmail.comdate n/Alex Yeoh d/NoneRemoves appointment date fromAlex Yeoh
Seeing the schedule for the day: schedule
Filters the list to return patients who have an appointment of the given day.
(i.e. shows the healthcare professional’s schedule for the day)
Format: schedule d/DATE
Parameter Constraints: DATE
Additional Details:
DATEin theschedulefeature differs from theDATE_TIMEin thedatefeature as it does not accept a time.- All patients with an appointment date on that given day will be listed regardless of what their appointment time is.
- Refer to additional details under the appointment date feature above for details on the date format and valid values.
Examples:
schedule d/23/10/2024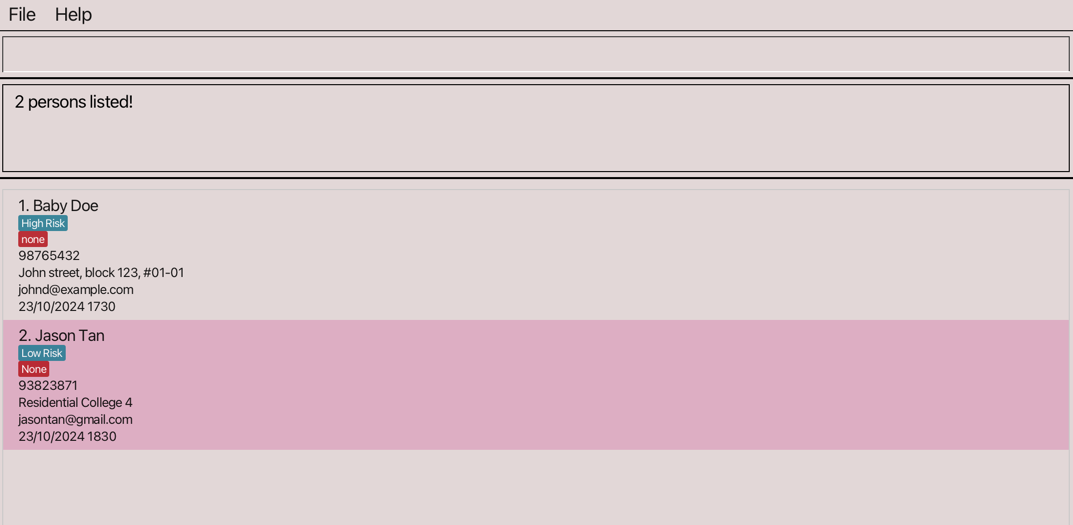 returns all patients with appointment date on 23rd October 2024
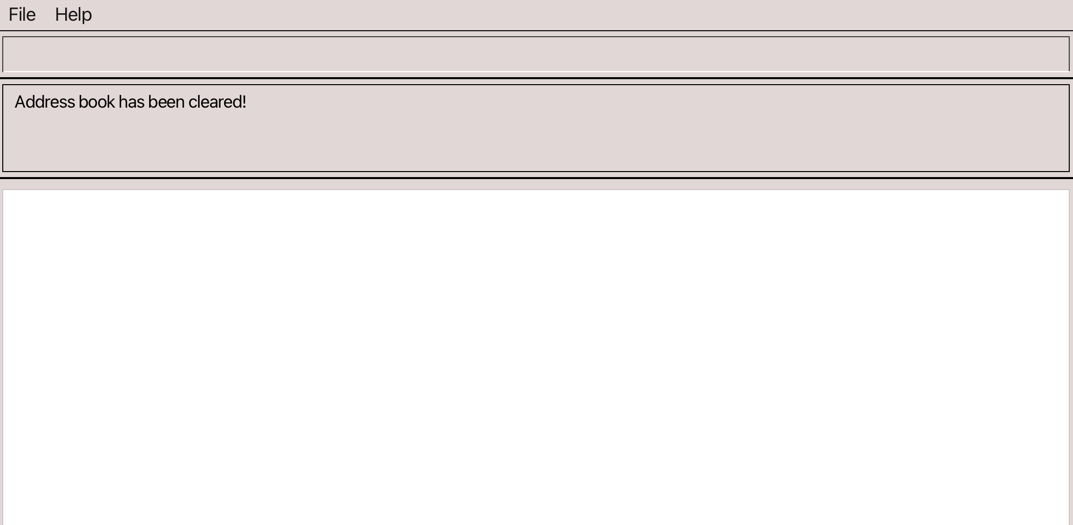
Clearing all entries : clear
Clears all entries from the address book.
Format: clear
Exiting the program : exit
Exits the program.
Format: exit
Data
Saving the data
The data is saved in the hard disk automatically after any command that changes the data. There is no need to save manually.
Editing the data file
The data is saved automatically as a JSON file [JAR file location]/data/addressbook.json. Advanced users are welcome to update data directly by editing that data file.
If your changes to the data file makes its format invalid, Health Connect will discard all data and start with an empty data file at the next run. Hence, it is recommended to take a backup of the file before editing it.
Furthermore, certain edits can cause Health Connect to behave in unexpected ways (e.g., if a value entered is outside the acceptable range). Therefore, edit the data file only if you are confident that you can update it correctly.
FAQ
Q: How do I transfer my data to another Computer?
A: Install the app in the other computer by following the instructions in Quick Start and overwrite the empty data file it creates with the file that contains the data of your previous home folder.
- Find the
datafolder created by the application
- Transfer the
.jsonfile in the `data folder ——————————————————————————————————————–
Known Issues
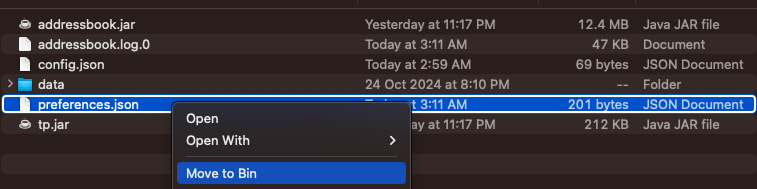
Issue 1: When using multiple screens, if you move the application to a secondary screen, and later switch to using only the primary screen, the GUI will open off-screen.
Remedy: Delete the preferences.json file created by the application in the same folder before running the application again.
Issue 2: If you minimize the Help Window and then run the help command again, the original Help Window will remain minimized, and no new Help Window will appear.
Remedy: Manually restore the minimized Help Window.
Command Summary
| Action | Format & Examples | Examples |
|---|---|---|
| Add | add n/NAME p/PHONE e/EMAIL a/ADDRESS t/TAG m/ALLERGY... |
add n/James Ho p/98765432 e/jamesho@example.com a/123 Clementi Rd t/High Risk m/peanuts |
| Edit | edit INDEX [n/NAME] [p/PHONE] [e/EMAIL] [a/ADDRESS] [t/TAG] [m/ALLERGY]... |
edit 2 n/James Lee e/jameslee@example.com |
| Delete | delete [n/NAME] [p/PHONE] [e/EMAIL] |
delete n/Nayana p/98765432 e/nayana@gmail.com |
| Clear | clear |
- |
| View | view |
- |
| Find | find KEYWORD [MORE_KEYWORDS] |
find James Jake |
| Filter | filter PREFIX/FEATURE_NAME [PREFIX/FEATURE_NAME] |
filter t/High Risk |
| Date | date [n/NAME] [p/PHONE] [e/EMAIL] d/DATE_TIME |
date n/Jason Tan p/93823871 e/jasontan@gmail.com d/23/10/2024 1830 |
| Schedule | schedule d/DATE |
schedule d/23/10/2024 |
| Exit | exit |
- |
| Help | help |
- |